
What is Kernel?
Kernel is a software program on which the entire OS runs and interacts with the system hardware. It acts as a basic communication line between the application programs and hardware resources. Even the operating system itself cannot access hardware resources without the help of the kernel. In other words, without a kernel, the operating system won’t work.
For instance, you want to take a video and you opened your camera application. The application has to invoke some OS functionalities and the OS will send a request to the kernel and then the kernel will provide access to the camera hardware. In other words, your camera app is just a simple code. It cannot access camera hardware without the kernel. Therefore, a kernel is considered one of the major components of every system. Almost, every PC/Laptop/Smartphones that have a proper OS will have a Kernel.
Why Kernel is Important?
A Kernel is like a manager who manages every system aspect internally. A kernel manages various tasks such as
- Security: It provides security to your hardware by curbing approvals to malicious application requests.
- Disk Management: Kernel manages the allocation and allocation of memory resources.
- Device Management: The I/O devices are connected to the system is used by the processes to do certain tasks. Therefore, the allocation of these devices is managed by the Kernel.
Kernel almost manages every internal aspect of a system. It has complete control over the system. In other words, Kernel is the one that controls the performance, memory, and battery aspects of the device.
Which Kernel is used in Android? What is Stock Kernel?
Stock Kernel: The kernel that comes with your Stock ROM is called the stock kernel. It lives up to what the OEM promises. Android is currently powering almost 70 per cent of the total mobile market and it runs on Linux Kernel. Google has been using Linux Kernel as the base for Android since the OS was developed. The current kernel version since then has now moved to 4.x after going through several iterations, accounting for 2 major version changes.
However, every phone does not have the same kernel. The kernel might get changed with your current OEM. For instance, if you are using OnePlus, you might see a different kernel that’s developed by OnePlus.
What is Custom Kernel?
A Custom Kernel is different from a Stock Kernel or OEM Kernel. A Custom Kernel is usually made by developers and tech-savvy people who are interested in enhancing the performance of the device by tweaking things inside. Therefore, Custom Kernels not only offer security updates but also delivers various improvements over the Stock Kernel. Therefore, if you want to increase the performance or battery life of your mobile device, you have to concentrate more on changing the kernel.
As told above, the kernel has complete control over the system. It means that not only a Custom Kernel can improve your experience but can also damage your device if tinkered wrongly. Therefore, installing a Custom Kernel is not an easy task.
- First of all, You need to find suitable yet trusted kernel sources to install. We are the daily hunters of stuff like that on the Internet. You can follow us on the Telegram group link given below to stay updated.
- Choosing the right Custom Kernel and installing it. This is the bigger task. Every ROM doesn’t support a Custom Kernel. Therefore, you need to check twice and confirm the compatibility before installing it.
How to Install Custom Kernel: Prerequisites
Before you know how to install a Custom Kernel, make sure you have the following prerequisites given below.
1. Installing TWRP: First of all, install TWRP on your device. TWRP is a custom recovery used to Install Custom ROMS on your device. You can use TWRP to install, backup, and change the Kernels easily. If you don’t know what is TWRP and how to install it, check this post to know more about it.
2. Backup your Current Kernel: After installing the TWRP, all you need to do is backup your current kernel. You can do this by going to the “Backup” and check the “Boot” option in the given list. You only need to check Boot.
After checking the boot option, all you need to do is choosing the target location where you want to store the kernel. It can be on “SD Card” or “Internal Storage.

Install Custom Kernel: The Main Process
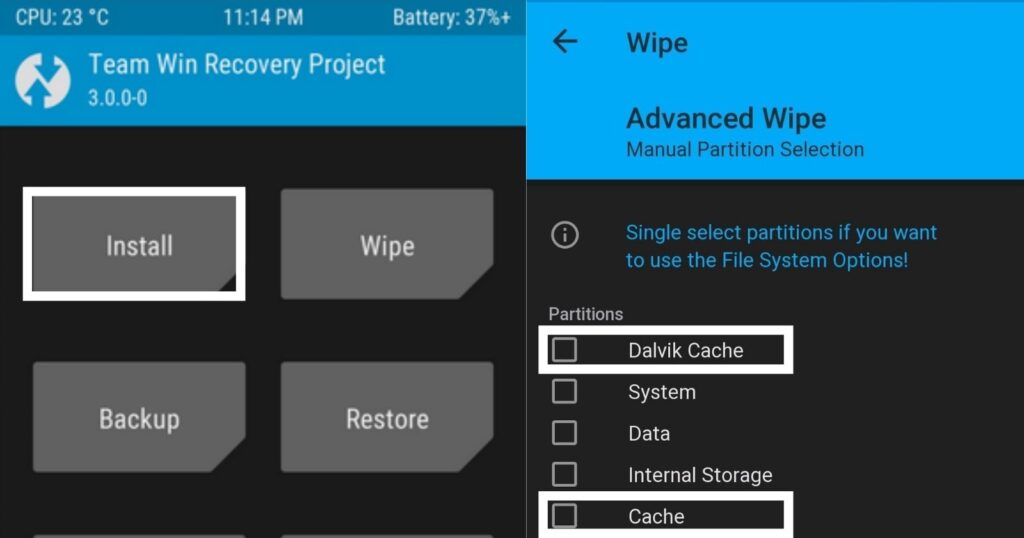
After backing up the current kernel, all you need to do is go to “Wipe” and then “Advanced Wipe” in TWRP. Check the options “Dalvik ART Cache” & “Cache” from the given list and select “Swipe to Wipe”.
Once the process is completed, go back and click on the “Install” option and then locate the Custom Kernel file stored in your phone and install it.
Install Custom Kernel: How to check it?
Once you install your Custom Kernel, you can check the installation status by going to “Settings” and then the “About Phone” option. You can find the installed kernel on your device here. If the name was matched with the Custom Kernel, your kernel is ready to roll.
If you got any problems, you can revert through the backup stored earlier by using TWRP.


Follow our official Telegram Channel for more updates and interesting posts