
GPT Engineer: When it comes to the world of software development, the process of creating code can be a difficult and time-consuming endeavour. This was all before the advent of Chat GPT. However, Chat GPT has totally changed this dynamics. Chat GPT has revolutionised code generation by providing developers with a powerful tool for writing code more easily and efficiently. It can write, correct and can even convey the best possible ways to deploy it. However, there is still one thing it can’t do – working autonomously. Chat GPT, in its most basic form, needs supervision and activity from a person. It is mostly made as a language model that learns from human-made text, and it needs human help to make sure that its answers are correct and good.
GPT Engineer, a revolutionary software, could change the game’s dynamics. GPT Engineer uses Chat GPT to let developers build an entire codebase in response to a single request. Due to its adaptability, extensibility, and ability to learn coding styles, this tool allows efficient and customised code creation.


GPT Engineer is made to make the process of making code easier by using the features of Chat GPT. Developers start by giving a prompt that describes their code needs and any styles or models they want to use. GPT Engineer’s machine learning model analyses the prompt and generates a codebase that fits the criteria.There are a number of steps in the process.
- First, GPT Engineer reads the question and figures out what computer language and framework are needed to answer it.
- Next, it figures out what the code is supposed to do, which lets it make correct code.
- The tool also knows how to use certain coding standards, patterns, and best practises to make code that fits the style you want.
- Lastly, GPT Engineer makes a whole codebase with all the methods, classes, and dependencies it needs.
GPT Engineer’s real power comes from its ability to adapt to user tastes and learn from them. As developers work with the code that is generated, they can give comments and make changes. GPT Engineer uses this input to learn and make its model better over time. This iterative process lets developers fine-tune the output code so that it fits their exact needs. This increases productivity and shortens the time it takes to build something.
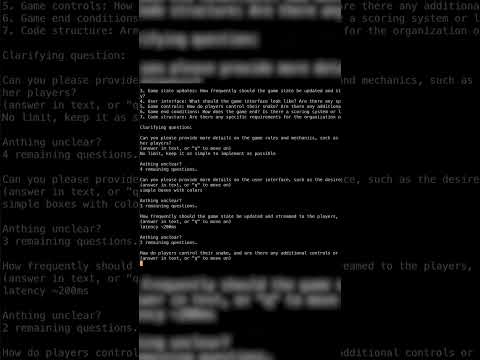
In other words, Users are required to specify what it is that they want to develop. After that, the AI engineer in chatgpt will ask for clarification before building it.
Benefits and Future Potential
The use of GPT Engineer provides developers with a number of appealing features. In the first place, it makes the process of code generation substantially faster, which not only gives a head start but also reduces the requirement for human coding. In addition, because of the tool’s adaptability, it is able to learn and adjust to the individual coding styles of the developer, resulting in code that is more in line with the preferences of the developer.
How to Install/Setup & Run GPT Engineer?
Step 1: Clone the Repository
Start by cloning the GPT Engineer repository from GitHub. Open your terminal and enter the following command: This command will download the repository to your local machine.
git clone git@github.com:AntonOsika/gpt-engineer.git
Step 2: Navigate to the Repository
Move into the cloned repository by entering the following command. This command will take you to the gpt-engineer directory.
cd gpt-engineer
Step 3: Install the Required Dependencies
Next, install the necessary dependencies. Enter the following command: This command will install the required packages for GPT Engineer.
Note: If you prefer to use a virtual environment, you can run the command make install to create a virtual environment and activate it using source venv/bin/activate.
pip install -e .
Step 4: Set up your OpenAI API Key
To access the GPT4 model, you need an API key from OpenAI. Set your API key as an environment variable by running the following command:
export OPENAI_API_KEY=[your api key]
Replace [your api key] with your actual OpenAI API key.
Step 5: Create a New Project
Create a new empty folder where you want to set up your project. If you’re inside the gpt-engineer repository, you can run the following command to copy the example project folder:
cp -r projects/example/ projects/my-new-project
This command duplicates the example project folder and renames it as “my-new-project.” You can choose any name for your project.
Step 6: Fill in the Main Prompt
Inside your newly created project folder (in this case, projects/my-new-project), you’ll find a file named “main_prompt”. Open this file and fill in the desired prompt for the code generation.
Step 7: Run GPT Engineer
Finally, run GPT Engineer to generate the code based on your prompt. In your terminal, enter the following command:
gpt-engineer projects/my-new-project
That’s it! You have now successfully installed and run GPT Engineer, and it has generated code based on your prompt. You can explore the generated code in your project folder and make any necessary modifications or additions as per your requirements.
Here’s a demo video of GPT Engineer that showcase its working. Check it out.
For more interesting news and reveals related to tech, follow us on our Facebook, Telegram channel. We haunt interesting news every day on the Internet.